React를 사용한 풀 스택 Solana 개발에 대한 완전한 가이드
React, Solana, Anchor 및 Phantom 지갑으로 전체 스택 dapp 구축.
에서 전체 스택 에테 리움 개발에 완전한 가이드 , 또한 다각형, 눈사태, 그리고 에테 리움 레이어 2 개의 같은 다른 EVM 호환 체인에 적용 할 수 에테 리움에서 전체 스택 응용 프로그램을 구축하는 방법에 깊은 다이빙을했다.
이 가이드에서는 전체 스택 앱을 빌드하는 방법을 보여주기 위해 Solana에 대해 자세히 알아보겠습니다. 또한 생태계와 개발자 도구를 소개하여 앞으로 자신만의 아이디어와 응용 프로그램을 구축하고 실행하는 데 도움이 되기를 바랍니다.
Solana 개발자 개요
사람으로 w 호 단지 내가 일어나서 실행하기 더 힘들어 것을 수 없습니다 가정의 종류는 약 6 개월 전 견고하고 생태계를 배우기 시작했다. 내가 틀렸어.
개발자 도구의 일부는 정말 훌륭하고 세련된 반면(Solana CLI 및 Anchor) 나머지 생태계와 Anchor에 대한 문서(공정하게 말하면 매우 새롭습니다)는 상당한 양을 요구합니다.
즉, 일단 모든 것을 이해하고 나면 자신의 아이디어를 구현하고 실험을 시작하는 방법을 이해하는 것이 훨씬 쉬워집니다.
답을 찾는 열쇠 중 하나는 모든 Google, Github, 특히 Anchor( 프로젝트 Serum ) 및 Solana를 위한 다양한 Discord 서버에서 검색하는 데 주의를 기울이는 것 입니다. 이러한 채널의 개발자, 특히 Anchor 프레임워크를 만든 Armani Ferrante는 매우 도움이 되었습니다 . 검색 기능에 익숙해지면 Discord의 과거 토론에서 질문에 대한 답변을 자주 찾을 수 있습니다.
프로젝트 개요
오늘 사용할 도구는 다음과 같습니다.
Solana 도구 모음 — 여기에는 Solana 네트워크와 상호 작용하기 위한 매우 세련되고 잘 문서화된 CLI가 포함되어 있습니다.
Anchor Framework — Anchor는 실제로 저에게 생명의 은인이며, Anchor 없이는 무엇이든 구축하는 고비를 넘지 못했을 것이라고 거의 확신합니다. Solana 개발 등 의 Hardhat 이며, 저는 그것을 좋아합니다. 또한 Rust 위에 DSL을 제공하므로 시작하기 위해 언어에 대한 깊은 이해가 필요하지 않습니다. 비록 DSL을 사용하더라도 사소한 것이 아닌 모든 것을 빌드하는 데 유용할 것이기 때문에 Rust를 배우려고 여전히 노력하고 있습니다. . Rust를 배울 수 있는 좋은 무료 장소는 Rust Book 입니다.
solana/web3.js — 꽤 잘 작동하는 것처럼 보이지만 설명서가 거의 사용할 수 없는 web3.js 의 Solana 버전
React — 클라이언트 측 프레임워크
다른 사람들이 나보다 더 잘 다룰 수 있기 때문에 나는 Solana 자체가 어떻게 작동하는지에 대한 모든 심층적인 세부 사항을 생략할 것입니다. 대신 저는 무엇인가를 구축하고 이를 달성하기 위해 알아야 할 세부 사항과 제가 가장 중요하다고 생각하는 사항을 공유하는 데 집중하려고 노력할 것입니다.
Solana와 작동 방식에 대해 더 알고 싶다면 다음 몇 가지 좋은 정보를 참조하세요.
이 가이드에서는 프로젝트 설정, 테스트 및 몇 가지 유형의 응용 프로그램을 구축하기 위한 프런트 엔드 클라이언트 통합에 주로 초점을 맞출 것입니다. 주로 CRUD 작업(물론 삭제 없이)에 중점을 두었습니다. 이 작업은 문서화되지 않은 것으로 나타났습니다( 클라이언트 애플리케이션과의 통합).
또한 Solana CLI를 사용하여 자체 개발 계정에 토큰을 에어드롭하고 로컬 네트워크와 라이브 테스트 네트워크 모두에 앱을 배포하는 방법을 배웁니다.
이 가이드에서는 NFT에 초점을 맞추지 않겠지만 향후 가이드에서는 이에 초점을 맞출 것입니다. 현재로서는 Solana에서 NFT 마켓플레이스를 구축하는 데 관심이 있다면 Metaplex를 확인하는 것이 좋습니다 .
전제 조건
이 튜토리얼은 Solana에서 전체 스택 앱을 빌드하는 방법을 다루지만 모든 개별 종속성을 설치하는 방법은 다루지 않습니다.
대신, 각 프로젝트가 내가 할 수 있는 것보다 이러한 것들을 더 잘 설명하고 문서화할 수 있을 뿐만 아니라 최신 상태로 유지할 수 있기 때문에 종속성을 나열하고 설치 방법에 대한 문서에 링크할 것입니다.
- Node.js — I recommend installing Node using either nvm or fnm
- Solana Tool Suite — You can see the installation instructions here. note — I had a very hard time getting everything working on an M1 Mac, mainly solana-test-validator and cargo-build-bpf. I finally figured it out, and posted my solution here. I'm sure at some point this will be fixed and work out of the box.
- Anchor (including the Mocha installation) — Anchor installation was pretty straight-forward for me. You can find the installation instructions here.
- Solana browser wallet — I recommend Phantom, which is what I have tested this app with.
Getting Started
Before we get started building, let’s take a look at the Solana CLI.
Solana CLI
The main things we’ll be doing with the Solana CLI will be configuring our network (between localhost and a developer testnet) as well as airdropping tokens into our wallets, pretty much everything else we’ll be doing with the Anchor CLI.
For instance, we can check the current network (and other) configuration with this command:
solana config get # output Config File: /Users/user/.config/solana/cli/config.yml RPC URL: https://api.devnet.solana.com WebSocket URL: wss://api.devnet.solana.com/ (computed) Keypair Path: /Users/user/.config/solana/id.json Commitment: confirmedIf you do not have a Keypair path, set one up by following the instructions here
We can change the network like so:
# set to localhost solana config set --url localhost # set to devnet solana config set --url devnetThis is important as you will need to be aware of which network you are using as you’re building, testing, and deploying your programs. You also need to be sure your wallet is using the same network that your local environment is using when testing, something I’ll cover.
We’ll be starting by developing on a localhost network, then switching to the devnet network.
We can also use the CLI to see our current local wallet address:
solana addressAnd then get the full details about an account:
solana account <address from above>Next let’s airdrop some tokens. To do so, first switch to the local network, as this is where we will be working to start off with:
solana config set --url localhostNext, start the local network. This is going to be a local Solana node that we can deploy for testing:
solana-test-validatorOnce the local network is running, you can airdrop tokens to your account. With the network running, open a separate window and run the following command:
solana airdrop 100You can check the balance of your wallet:
solana balance

# or

solana balance <address>
You should now have a balance of 100 SOL in your wallet. With that, we can get started building.
Let’s start building
To get started, initialize a new anchor project and change it into the new directory:
anchor init mysolanaapp

cd mysolanaapp
Be sure to use Anchor version 0.16.0 or later.
In this project, you’ll see four main folders (in addition to the node_modules):
app — Where our frontend code will go
programs — This is where the Rust code lives for the Solana program
test — Where the JavaScript tests for the program live
migrations — A basic deploy script
Let’s take a look at the program that was created for us.
Anchor uses, and enables us to write, an eDSL ( embedded DSL) that abstracts away many of the more complex low level operations you’d typically need to do if you were using Solana & Rust without it, making it more approachable for me.
// programs/src/lib.rs
use anchor_lang::prelude::*;

declare_id!("Fg6PaFpoGXkYsidMpWTK6W2BeZ7FEfcYkg476zPFsLnS");

#[program]
pub mod mysolanaapp {
    use super::*;
    pub fn initialize(ctx: Context<Initialize>) -> ProgramResult {
        Ok(())
    }
}

#[derive(Accounts)]
pub struct Initialize {}
This is probably the most basic program you can write. The only thing happening here is we are defining a function called initialize, which when invoked just exits the program successfully. There is no data manipulation at all.
The Initialize struct defines the context as being empty of any arguments. We'll learn more about the function context later.
To compile this program, we can run the Anchor build command:
anchor buildOnce a build is completed, you should see a new folder named target.
One of the artifacts created is an IDL located at target/idl/mysolanaapp.json.
IDLs are very similar to an ABI in Solidity (or a query definition in GraphQL), and we will be using them in a similar way in our JavaScript tests and frontends to communicate with our Solana program via RPC.
We can also test out our program. If you open tests/mysolanaapp.js, you will see that there is a test written in JavaScript that allows us to test out the program.
The test should look like this:
const anchor = require('@project-serum/anchor');

describe('mysolanaapp', () => {
  // Configure the client to use the local cluster.
  anchor.setProvider(anchor.Provider.env());

  it('Is initialized!', async () => {
    const program = anchor.workspace.Mysolanaapp;
    const tx = await program.rpc.initialize();
    console.log("Your transaction signature", tx);
  });
});
There are a couple of things to learn from this test that are important and we’ll be using in the future, both in our tests as well as in the front end JavaScript clients.
To call a Solana program using Anchor, we typically need two main things:
- Provider일반적으로 Connection, Wallet 및 실행 전 약정 으로 구성된 Solana 네트워크에 대한 연결의 추상화입니다 .
테스트에서 Anchor 프레임워크는 환경( anchor.Provider.env())을 기반으로 공급자를 생성 하지만 클라이언트에서는 사용자의 Solana 지갑을 사용하여 공급자를 직접 구성해야 합니다.
- , , 및 (프로그램이 빌드될 때 생성됨) program를 결합한 추상화로 프로그램 에 대해 메서드 를 호출할 수 있습니다 .ProvideridlprogramIDRPC
다시 말하지만 ProviderAnchor는 에 액세스할 수 있는 편리한 방법을 제공 program하지만 프론트 엔드를 구축할 때 이를 provider직접 구성해야 합니다 .
이 두 가지가 있으면 프로그램에서 함수 호출을 시작할 수 있습니다. 예를 들어, 우리 프로그램에는 initialize함수가 있습니다. 테스트에서 다음을 사용하여 해당 함수를 직접 호출할 수 있음을 알 수 있습니다 program.rpc.functionName.
const tx = program.rpc.initialize()를 기다립니다.이것은 Anchor로 작업할 때 많이 사용하게 될 매우 일반적인 패턴이며, 작동 방식을 이해하고 나면 Solana 프로그램에 연결하고 상호 작용하기가 정말 쉽습니다.
이제 test스크립트 를 실행하여 프로그램을 테스트할 수 있습니다 .
앵커 테스트Hello World 구축
이제 프로젝트 설정이 완료되었으므로 좀 더 흥미로운 것을 만들어 보겠습니다.
풀 스택 개발자로서 대부분의 경우 CRUD 유형의 작업 을 수행하는 방법이 궁금 하므로 다음에 살펴보겠습니다.
우리가 만들 첫 번째 프로그램을 사용하면 클라이언트 응용 프로그램에서 호출할 때마다 증가하는 카운터를 만들 수 있습니다.
가장 먼저 할 일은 programs/mysolanaapp/src/lib.rs를 열고 다음 코드로 업데이트하는 것입니다.
사용 anchor_lang::prelude::*;

선언 ID!("Fg6PaFpoGXkYsidMpWTK6W2BeZ7FEfcYkg476zPFsLnS");

#[프로그램]
mod mysolanaapp {
    슈퍼 사용::*;

    pub fn create(ctx: Context<Create>) -> ProgramResult {
        let base_account = &mut ctx.accounts.base_account;
        base_account.count = 0;
        Ok(())
    }

    pub fn increment(ctx: Context<Increment>) -> ProgramResult {
        let base_account = &mut ctx.accounts.base_account;
        base_account.count += 1;
        Ok(())
    }
}

// 트랜잭션 지침
#[derive(Accounts)]
pub struct Create<'info> {
    #[account(init, payer = user,
    pub base_account: Account<'info, BaseAccount>,
    #[account(mut)]
    pub user: Signer<'info>,
    pub system_program: Program <'info, System>,
}

// 트랜잭션 명령어
#[derive(Accounts)]
pub struct Increment<'info> {
    #[account(mut)]
    pub base_account: Account<'info, BaseAccount>,
}

// 트랜잭션 명령어에 들어가는
계정 #[account]
pub struct BaseAccount {
    pub count: u64,
}
이 프로그램에서 우리는 두 가지 기능을 가지고 - create와 increment. 이 두 함수는 프로그램과 상호 작용하기 위해 클라이언트 응용 프로그램에서 호출할 수 있는 RPC 요청 처리기입니다.
The first parameter of an RPC handler is the Context struct, which describes the context that will be passed in when the function is called and how to handle it. In the case of Create, we are expecting three parameters: base_account, user, and system_program.
The #[account(...)] attributes define constraints and instructions that are related to the proceeding account where declared. If any of these constraints do not hold, then the instruction will never execute.
Any client calling this program with the proper base_account can call these RPC methods.
The way that Solana deals with data is much different than anything I’ve ever worked with. There is no persisted state within the program, everything is attached to what is known as accounts. An account essentially holds all of the states of a program. Because of this, all data is passed by reference from the outside.
There are also no read operations. This is because all you need to do to read the contents of a program is to request the account, from there you are able to view all of the program’s state. To read more about how accounts work, check out this post.
To build the program:
anchor buildNext, let’s write a test that uses this counter program. To do so, open tests/mysolanaapp.js and update with the following code:
const assert = require("assert");
const anchor = require("@project-serum/anchor");
const { SystemProgram } = anchor.web3;

describe("mysolanaapp", () => {
  /* create and set a Provider */
  const provider = anchor.Provider.env();
  anchor.setProvider(provider);
  const program = anchor.workspace.Mysolanaapp;
  it("Creates a counter)", async () => {
    /* Call the create function via RPC */
    const baseAccount = anchor.web3.Keypair.generate();
    await program.rpc.create({
      accounts: {
        baseAccount: baseAccount.publicKey,
        user: provider.wallet.publicKey,
        systemProgram: SystemProgram.programId,
      },
      signers: [baseAccount],
    });

    /* Fetch the account and check the value of count */
    const account = await program.account.baseAccount.fetch(baseAccount.publicKey);
    console.log('Count 0: ', account.count.toString())
    assert.ok(account.count.toString() == 0);
    _baseAccount = baseAccount;

  });

  it("Increments the counter", async () => {
    const baseAccount = _baseAccount;

    await program.rpc.increment({
      accounts: {
        baseAccount: baseAccount.publicKey,
      },
    });

    const account = await program.account.baseAccount.fetch(baseAccount.publicKey);
    console.log('Count 1: ', account.count.toString())
    assert.ok(account.count.toString() == 1);
  });
});
계속해서 프로그램을 테스트하고 배포하기 전에 빌드에 의해 생성된 동적으로 생성된 프로그램 ID를 얻고 싶습니다. 프로젝트를 생성할 때 설정한 자리 표시자 ID를 대체하기 위해 Rust 프로그램에서 이 ID가 필요합니다. 이 ID를 얻으려면 다음 명령을 실행할 수 있습니다.
솔라나 주소 -k target/deploy/mysolanaapp-keypair.json이제 lib.rs 에서 프로그램 ID를 업데이트할 수 있습니다 .
// mysolanaapp/src/lib.rs 선언

ID!("프로그램 ID");
그리고 Anchor.toml에서 :
# Anchor.toml
[programs.localnet]
mysolanaapp = "your-program-id"
다음으로 테스트를 실행합니다.
앵커 테스트테스트를 통과하면 이제 배포할 수 있습니다.
이제 프로그램을 배포할 수 있습니다. 다음 solana-test-validator이 실행 중인지 확인하십시오 .
앵커 배포별도의 창을 열고 다음을 실행하여 유효성 검사기 로깅을 볼 수도 있습니다. solana logs
이제 프런트 엔드를 구축할 준비가 되었습니다.
React 앱 빌드
Anchor 프로젝트의 루트에서 새로운 반응 앱을 생성하여 기존 앱 디렉토리 를 덮어씁니다 .
npx 만들기 반응 앱 앱다음으로 Anchor 및 Solana Web3에 필요한 종속성을 설치합니다.
CD 앱 npm 설치 @project-serum/anchor @solana/web3.js또한 사용자의 Solana 지갑 연결을 처리하기 위해 Solana 지갑 어댑터 를 사용할 것 입니다. 해당 종속성도 설치해 보겠습니다.
npm install @solana/wallet-adapter-react \ @solana/wallet-adapter-react-ui @solana/wallet-adapter-wallets \ @solana/wallet-adapter-base다음으로, src 디렉토리에서 idl.json 이라는 새 파일을 만듭니다 . 여기에서 target/idl/mysolanaapp.json 에 있는 기본 프로젝트 폴더에 생성된 IDL JSON을 복사합니다 .
이 idl 파일을 복사하여 클라이언트 응용 프로그램 src 폴더 에 동적으로 생성 할 수 있으면 좋겠지 만 현재로서는 기본적으로 이 작업을 수행하는 방법을 찾지 못했습니다. 물론 원하는 경우 이 작업을 수행하는 고유한 스크립트를 만들 수 있습니다. 그렇지 않으면 기본 프로그램을 변경할 때마다 IDL을 복사하여 붙여넣을 필요가 있습니다.
이와 같은 스크립트를 원하면 몇 줄의 코드로 수행할 수 있습니다.
// copyIdl.js
const fs = require('fs');
const idl = require('./target/idl/mysolanaapp.json');

fs.writeFileSync('./app/src/idl.json', JSON.stringify(idl));
Next, open app/src/App.js and update it with the following:
import './App.css';
import { useState } from 'react';
import { Connection, PublicKey } from '@solana/web3.js';
import {
  Program, Provider, web3
} from '@project-serum/anchor';
import idl from './idl.json';

import { getPhantomWallet } from '@solana/wallet-adapter-wallets';
import { useWallet, WalletProvider, ConnectionProvider } from '@solana/wallet-adapter-react';
import { WalletModalProvider, WalletMultiButton } from '@solana/wallet-adapter-react-ui';

const wallets = [
  /* view list of available wallets at https://github.com/solana-labs/wallet-adapter#wallets */
  getPhantomWallet()
]

const { SystemProgram, Keypair } = web3;
/* create an account  */
const baseAccount = Keypair.generate();
const opts = {
  preflightCommitment: "processed"
}
const programID = new PublicKey(idl.metadata.address);

function App() {
  const [value, setValue] = useState(null);
  const wallet = useWallet();

  async function getProvider() {
    /* create the provider and return it to the caller */
    /* network set to local network for now */
    const network = "http://127.0.0.1:8899";
    const connection = new Connection(network, opts.preflightCommitment);

    const provider = new Provider(
      connection, wallet, opts.preflightCommitment,
    );
    return provider;
  }

  async function createCounter() {
    const provider = await getProvider()
    /* create the program interface combining the idl, program ID, and provider */
    const program = new Program(idl, programID, provider);
    try {
      /* interact with the program via rpc */
      await program.rpc.create({
        accounts: {
          baseAccount: baseAccount.publicKey,
          user: provider.wallet.publicKey,
          systemProgram: SystemProgram.programId,
        },
        signers: [baseAccount]
      });

      const account = await program.account.baseAccount.fetch(baseAccount.publicKey);
      console.log('account: ', account);
      setValue(account.count.toString());
    } catch (err) {
      console.log("Transaction error: ", err);
    }
  }

  async function increment() {
    const provider = await getProvider();
    const program = new Program(idl, programID, provider);
    await program.rpc.increment({
      accounts: {
        baseAccount: baseAccount.publicKey
      }
    });

    const account = await program.account.baseAccount.fetch(baseAccount.publicKey);
    console.log('account: ', account);
    setValue(account.count.toString());
  }

  if (!wallet.connected) {
    /* If the user's wallet is not connected, display connect wallet button. */
    return (
      <div style={{ display: 'flex', justifyContent: 'center', marginTop:'100px' }}>
        <WalletMultiButton />
      </div>
    )
  } else {
    return (
      <div className="App">
        <div>
          {
            !value && (<button onClick={createCounter}>Create counter</button>)
          }
          {
            value && <button onClick={increment}>Increment counter</button>
          }

          {
            value && value >= Number(0) ? (
              <h2>{value}</h2>
            ) : (
              <h3>Please create the counter.</h3>
            )
          }
        </div>
      </div>
    );
  }
}

/* wallet configuration as specified here: https://github.com/solana-labs/wallet-adapter#setup */
const AppWithProvider = () => (
  <ConnectionProvider endpoint="http://127.0.0.1:8899">
    <WalletProvider wallets={wallets} autoConnect>
      <WalletModalProvider>
        <App />
      </WalletModalProvider>
    </WalletProvider>
  </ConnectionProvider>
)

export default AppWithProvider;
Switching your wallet network
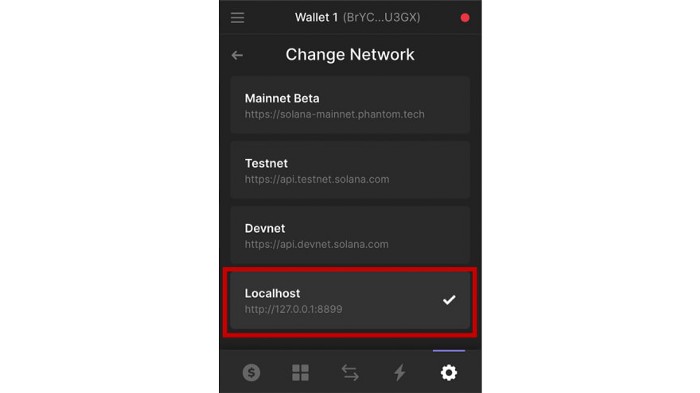
localhost네트워크 의 프로그램과 상호 작용하기 전에 팬텀 지갑을 적절한 네트워크로 전환해야 합니다.
그렇게 하려면 팬텀 지갑을 열고 설정 버튼을 클릭하세요. 그런 다음 아래로 스크롤하여 네트워크 변경 :

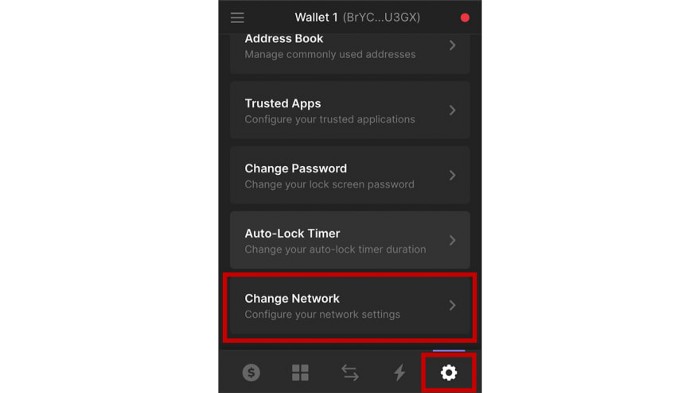
다음으로 Localhost를 선택합니다 .

이제 이 지갑에 토큰을 에어드롭해야 합니다. 지갑 인터페이스 상단에서 주소를 클릭하여 클립보드에 복사합니다.
다음으로 터미널을 열고 다음 명령을 실행합니다( solana-test-validator실행 중인지 확인 ).
솔라나 에어드랍 10 <주소>이제 지갑에 10개의 토큰이 있어야 합니다. 이제 앱을 실행하고 테스트할 수 있습니다!
앱 디렉터리 로 변경 하고 다음 명령을 실행합니다.
npm 시작지갑을 연결하고 카운터를 생성하고 증가시킬 수 있어야 합니다.
새로 고침하면 프로그램 상태가 손실된다는 것을 알 수 있습니다. 이는 프로그램이 로드될 때 기본 계정을 동적으로 생성하기 때문입니다. 다양한 클라이언트에서 프로그램 데이터를 읽고 상호 작용하려면 프로젝트 어딘가에 키 쌍을 만들고 저장해야 합니다. 나는 이것이 어떻게 보이는지에 대한 순진한 접근 방식의 요점 을 정리 했습니다 .
헬로 월드 2부
카운터를 처리하는 대신 메시지를 생성하고 이전에 생성된 모든 메시지를 추적할 수 있는 이 프로그램의 변형을 만들어 보겠습니다.
그렇게 하기 위해 우리의 Rust 프로그램을 다음과 같이 업데이트합시다:
/* program/mysolanaapp/src/lib.rs */
사용 anchor_lang::prelude::*;

선언 ID!("당신의 프로그램 ID");

#[프로그램]
mod mysolanaapp {
    슈퍼 사용::*;

    pub fn initialize(ctx: Context<초기화>, 데이터: 문자열) -> ProgramResult {
        let base_account = &mut ctx.accounts.base_account;
        복사 = data.clone();
        base_account.data = 데이터;
        base_account.data_list.push(복사);
        Ok(())
    }

    pub fn update(ctx: Context<업데이트>, 데이터: 문자열) -> ProgramResult {
        let base_account = &mut ctx.accounts.base_account;
        복사 = data.clone();
        base_account.data = 데이터;
        base_account.data_list.push(복사);
        Ok(())
    }
}

#[derive(Accounts)]
pub struct Initialize<'info> {
    #[account(init, payer = user, space = 64 + 64)]
    pub base_account: Account<'info, BaseAccount>,
    #[account(mut)]
    pub 사용자: 서명자<'info>,
    pub system_program: Program<'info, System>,
}

#[derive(Accounts)]
pub struct Update<'info> {
    #[account(mut)]
    pub base_account: Account<'info, BaseAccount>,
}

#[account]
pub struct BaseAccount {
    pub data: String,
    pub data_list: Vec<String>,
}
In this program we have two main pieces of data we’re keeping track of, a String named data and a Vector that holds a list of all data ever added to the program named data_list.
You’ll notice that the memory allocation here is higher ( 128 + 128) than the previous program in order to account for the Vector. I don't know how many updates you'd be able to store in this program as is, but may be something to investigate more or experiment with, as this example in and of itself is experimental and just to give you an understanding of how things work.
Next, we can update the test for this new program:
const 주장 = 요구(" 주장");
const 앵커 = require("@project-serum/anchor");
const { 시스템 프로그램 } = anchor.web3;

describe("Mysolanaapp", () => {
  const provider = anchor.Provider.env();
  anchor.setProvider(provider);
  const program = anchor.workspace.Mysolanaapp;
  it("계정을 초기화합니다", async() => {
    const baseAccount = anchor.web3.Keypair.generate();
    await program.rpc.initialize("Hello World", {
      계정: {
        baseAccount: baseAccount.publicKey,
        사용자: provider.wallet.publicKey,
        systemProgram: SystemProgram. programId,
      },
      서명자: [baseAccount],
    });

    const 계정 = program.account.baseAccount.fetch(baseAccount.publicKey)를 기다립니다.
    console.log('데이터: ', 계정 데이터);
    assert.ok(account.data === "Hello World");
    _baseAccount = 기본 계정;

  });

  it("이전에 생성된 계정을 업데이트합니다.", async () => {
    const baseAccount = _baseAccount;

    await program.rpc.update("Some new data", {
      accounts: {
        baseAccount: baseAccount.publicKey,
      },
    });

    const account = await program.account.baseAccount.fetch(baseAccount.publicKey);
    console.log('업데이트된 데이터: ', account.data)
    assert.ok(account.data === "Some new data");
    console.log ('모든 계정 데이터:', 계정)
    console.log('모든 데이터: ', account.dataList);
    assert.ok(account.dataList.length === 2);
  });
});
테스트하려면:
앵커 테스트테스트가 실패하면 유효성 검사기를 끄고 다시 실행해 보십시오.
다음으로 클라이언트를 업데이트하겠습니다.
가져오기 './App.css';
'반응'에서 { useState } 가져오기;
'@solana/web3.js'에서 { 연결, PublicKey } 가져오기;
'@project-serum/anchor'에서 { Program, Provider, web3 } 가져오기;
'./idl.json'에서 idl 가져오기;

'@solana/wallet-adapter-wallets'에서 { getPhantomWallet } 가져오기;
'@solana/wallet-adapter-react'에서 { useWallet, WalletProvider, ConnectionProvider } 가져오기;
'@solana/wallet-adapter-react-ui'에서 { WalletModalProvider, WalletMultiButton } 가져오기;

const 지갑 = [ getPhantomWallet() ]

const { 시스템 프로그램, 키 쌍 } = web3;
const baseAccount = Keypair.generate();
const opts = {
  preflightCommitment: "처리됨"
}
const programID = 새로운 PublicKey(idl.metadata.address);

함수 앱() {
  const [값, setValue] = useState('');
  const [dataList, setDataList] = useState([]);
  const [입력, setInput] = useState('');
  const wallet = useWallet()

  async function getProvider() {
    /* 공급자를 만들고 호출자에게 반환 */
    /* 현재 로컬 네트워크로 설정된 네트워크 */
    const network = "http://127.0.0.1:8899" ;
    const 연결 = 새로운 연결(네트워크, opts.preflightCommitment);

    const 공급자 = 새로운 공급자(
      연결, 지갑, opts.preflightCommitment,
    );
    반환 공급자;
  }

  비동기 함수 initialize() {
    const 공급자 = getProvider()를 기다립니다.
    /* idl, 프로그램 ID 및 공급자를 결합한 프로그램 인터페이스를 만듭니다. */
    const program = new Program(idl, programID, provider);
    try {
      /* rpc를 통해 프로그램과 상호 작용 */
      await program.rpc.initialize("Hello World", {
        계정: {
          baseAccount: baseAccount.publicKey,
          사용자: provider.wallet.publicKey,
          systemProgram: SystemProgram.programId,
        },
        서명자: [baseAccount]
      });

      const 계정 = program.account.baseAccount.fetch(baseAccount.publicKey)를 기다립니다.
      console.log('계정: ', 계정);
      setValue(account.data.toString());
      setDataList(계정.dataList);
    } catch(err) {
      console.log("트랜잭션 오류: ", err);
    }
  }

  비동기 함수 업데이트() {
    if (!input) 반환
    const 공급자 = await getProvider();
    const 프로그램 = 새로운 프로그램(idl, programID, 공급자);
    program.rpc.update(입력, {
      계정: {
        baseAccount: baseAccount.publicKey
      }
    })를 기다립니다 .

    const 계정 = program.account.baseAccount.fetch(baseAccount.publicKey)를 기다립니다.
    console.log('계정: ', 계정);
    setValue(account.data.toString());
    setDataList(계정.dataList);
    세트입력('');
  }

  if (!wallet.connected) {
    return (
      <div style={{ display: 'flex', justifyContent: 'center', marginTop:'100px' }}>
        <WalletMultiButton />
      </div>
    )
  } else {
    return (
      <div className="App">
        <div>
          {
            !value && (<button onClick={initialize}>초기화</button>)
          }

          {
            값 ? (
              <div>
                <h2>현재 값: {value}</ h2>
                <입력
                  자리 표시자="

                  value={input}
                />
                <button onClick={update}>데이터 추가</button>
              </div>
            ) : (
              <h3>초기화하십시오.</h3>
            )
          }
          {
            dataList.map((d, i) => <h4 키={i}>{d}</h4>)
          }
        </div>
      </div>
    );
  }
}

const AppWithProvider = () => (
  <ConnectionProvider 엔드포인트="http://127.0.0.1:8899">
    <WalletProvider 지갑={지갑}
      autoConnect>
        < WalletModalProvider> <앱 />
      <

  </ConnectionProvider>
)

기본 AppWithProvider 내보내기;
다음으로 프로그램을 빌드하고 배포합니다(다음을 확인하십시오 solana-test-validator is running).
앵커 빌드

앵커 배포
새 빌드를 사용하면 클라이언트에 대해 업데이트해야 하는 새 IDL 이 생깁니다 . 새 IDL을 app/src/idl.json에 복사 하거나 copyIdl.js 스크립트를 실행하십시오 .
테스트
새 프로그램을 테스트할 때 빌드에 의해 생성된 idl.json 파일 을 업데이트해야 합니다 .
앱 디렉터리 로 변경 하고 다음 start명령을 실행합니다 .
npm 시작데브넷에 배포
여기에서 라이브 네트워크에 배포하는 것은 매우 간단합니다. 우리가 해야 할 주요 사항은 다음과 같습니다.
- 사용할 팬텀 지갑 업데이트 devnet:
솔라나 설정 세트 --url devnet- Anchor.toml을 열고 클러스터를 에서 localnet로 업데이트합니다 devnet.
- 프로그램을 다시 빌드하십시오. Anchor.toml 의 프로그램 ID가 현재 프로그램 ID와 일치 하는지 확인하십시오 .
- 프로그램을 다시 배포합니다. 이번에는 다음에 배포됩니다. devnet
- 에서 응용 프로그램 / SRC / App.js , 우리는 또한을 사용하여,이 시간 네트워크를 업데이트 할 필요 clusterApiUrl에서 @solana/web3다음과 같이 :
/* 전 */
<ConnectionProvider endpoint="http://127.0.0.1:8899">

/* 후 */
import {
  ...,
  clusterApiUrl
} from '@solana/web3.js';

const 네트워크 = clusterApiUrl('devnet');

<ConnectionProvider 엔드포인트={네트워크}>
여기에서 이전 단계를 수행한 것처럼 배포하고 테스트할 수 있어야 합니다.
이와 같은 기술로 풀 타임으로 작업하는 데 관심이 있다면 저와 Edge & Node 팀에 합류하여 채용하고 있습니다!
'Study > 블록체인' 카테고리의 다른 글
| #1 Solana 토큰 생성 / 지갑 사용 (0) | 2022.01.23 |
|---|---|
| Solana Chat Dapp (0) | 2022.01.19 |
| Rust, Solana, Ancher 처음부터 DAPP 만들어보기 (0) | 2022.01.13 |
| Web3.0 크러스트 파일 공유 / 크러스트파일 (0) | 2022.01.12 |
| [블록체인] <Ethereum Request for Comment 20> ERC20이란? (0) | 2021.11.12 |
|

|

|

|

|